 Documentation
Ventalen DK-1-ZB-S
DAIKIN S21 air-conditioning gateway — Zigbee 3.0
Covered order codes (1)
VA-H-DK-1-ZB-S-A
The Ventalen DK-1-ZB-S is a Zigbee gateway for control and monitoring of DAIKIN air-conditioning systems with an S21 connector. It is intended for split, multi-split, column and wall-mounted systems. Product range: Ventalen AIR; series: HOME; hardware version: A. Order code: VA-H-DK-1-ZB-S-A.
Wiren Board integration is listed from release wb-2507 through Zigbee2MQTT. Native Zigbee2MQTT support is listed from version 2.6.1. Earlier installations may require the external converter provided in section 6.
2. Technical specifications
| Connection | Zigbee 3.0 |
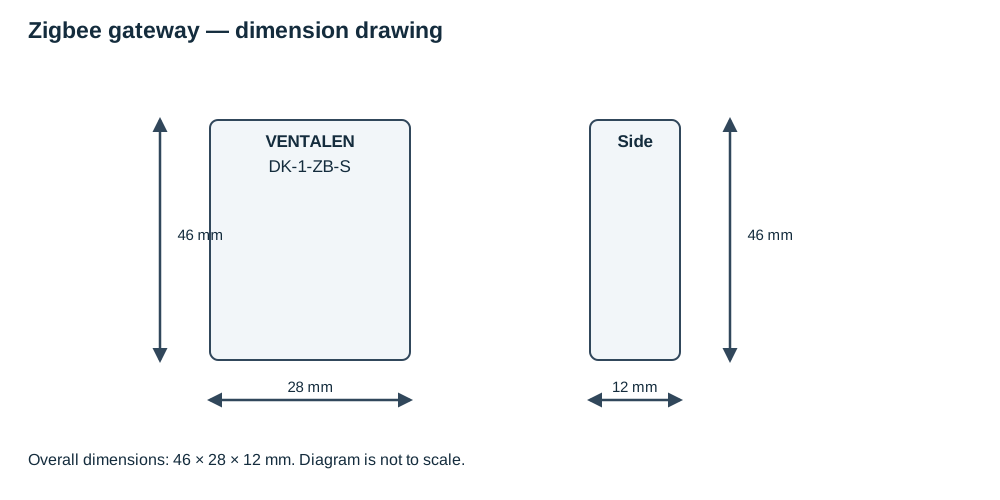
| Gateway dimensions | 46 × 28 × 12 mm (L × W × H) |
| Power supply | 12 V |
| Power consumption | 1 W maximum |
| Operating mode | Continuous |
| Operating temperature | 0 to +40 °C |
| Ingress protection | IP30 |
| Weight (including packaging) | 105 g |
| Package contents | Box, device, cable |
2.1 Hardware versions
Version A is listed as the current version, produced from December 2025 onwards.
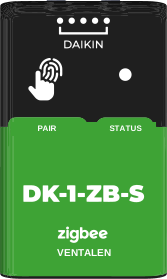
2.2 Device drawing
2.3 Package contents
Box, gateway and connection cable.
2.4 Dimensions
2.5 Ports and buttons
2.6 Status indication
2.6.1 Pairing with a coordinator
- Enable joining on the coordinator.
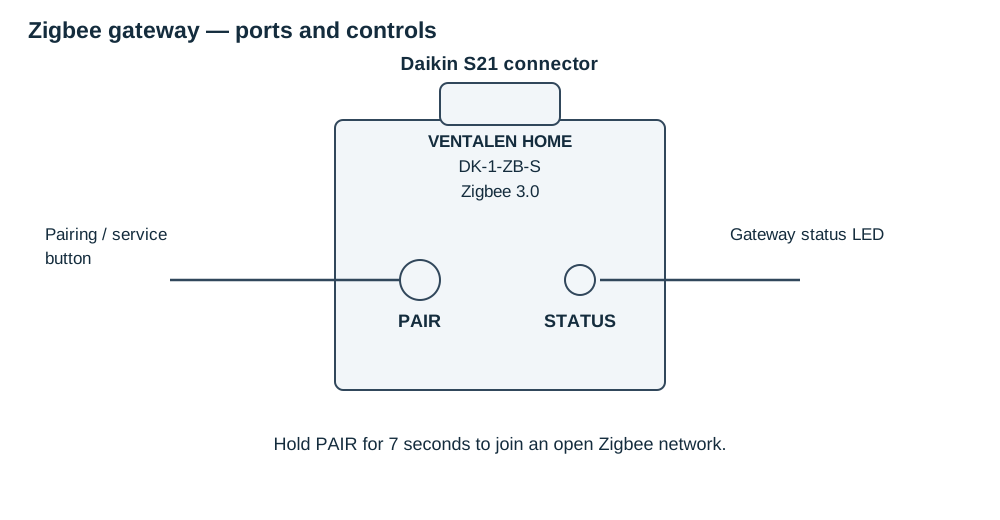
- Press and hold the pairing button for seven seconds. The indicator lights orange.
- Release the button. The indicator flashes faster.
- The coordinator detects and interviews the gateway. When the connection is established, the indicator turns off.
2.6.2 No communication with the air conditioner
Check the interface cable and its connectors as described in section 4.1.
2.6.3 Joined to the Zigbee network, but the coordinator does not respond
The indicator alternates red and green.
2.6.4 Gateway has left or been removed from the Zigbee network
The indicator lights red.
2.6.5 Normal operation
When Zigbee and air-conditioner communication are both available, the indicator is off.
3. Device appearance
The compact enclosure contains the Zigbee radio and an interface connector for the air conditioner. The pairing button and status LED are shown in the device and port drawings.
4. Quick start
- Disconnect the air conditioner from its power supply.
- Do not install the gateway in a damp location.
- Connect the Zigbee gateway to the air conditioner's S21 connector.
- Check the wiring before restoring power to the air conditioner.
- Enable joining on the Zigbee coordinator.
- Hold the gateway's pairing button for seven seconds until the indicator lights orange, then release it.
- Wait for the coordinator to detect and interview the gateway. The indicator turns off when the connection is established.
4.1 Troubleshooting
Check the interface cable at the air conditioner's connector. Both ends must be fully inserted, neither connector may be broken, and the cable conductors must be correctly retained in both connectors.
5. Zigbee cluster map
Endpoint configuration
Main endpoint: 1. Input/server clusters: Basic, Identify, On/Off, Thermostat and Fan Control. Output/client clusters: Identify (0x0003) and OTA Upgrade (0x0019).
Basic — 0x0000
Endpoint 1; input/server. Standard attributes:
| ID (hex) | Attribute name | Data type | Access | Value / range | Description |
|---|---|---|---|---|---|
| 0x0000 | ZCLVersion | uint8 | R | 8 | ZCL version |
| 0x0003 | HWVersion | uint8 | R | 1 | Hardware version |
| 0x0004 | ManufacturerName | string | R | Device-reported string (firmware dependent) | Manufacturer |
| 0x0005 | ModelIdentifier | string | R | Device-reported string (firmware dependent) | Device model |
| 0x0007 | PowerSource | enum8 | R | 4 (DC Source) | Power source |
| 0x4000 | SWBuildID | string | R | x.x.x | Software version |
Thermostat — 0x0201
Endpoint 1; input/server. Standard attributes:
| ID (hex) | Attribute name | Data type | Access | Value / range | Description |
|---|---|---|---|---|---|
| 0x0000 | LocalTemperature | int16 | R | 1500 | Indoor temperature (0.01 °C) |
| 0x0011 | OccupiedCoolingSetpoint | int16 | RW | 2300/1600-3200 | Cooling setpoint (0.01 °C) |
| 0x001C | SystemMode | enum8 | RW | 0x00: Off; 0x01: Auto; 0x03: Cooling; 0x04: Heating; 0x07: Fan only; 0x08: Dry | System operating mode |
| 0x001E | ThermostatRunningMode | enum8 | R | 0x00: Off; 0x01: Auto; 0x03: Cooling; 0x04: Heating; 0x07: Fan only; 0x08: Dry | Current operating mode |
Manufacturer-specific attributes (manufacturer code 0x4703, decimal 18179):
| ID (hex) | Attribute name | Data type | Access | Value / range | Manufacturer code | Description |
|---|---|---|---|---|---|---|
| 0x4700 | HorizontalVanes | enum8 | R/W | 0: Stopped 1: Swing |
HEX: 0x4703
DEC: 18179
|
Horizontal vane position |
| 0x4701 | VerticalVanes | enum8 | R/W | 0: Stopped 1: Swing |
HEX: 0x4703
DEC: 18179
|
Vertical vane position |
| 0x4702 | AirDirection | enum8 | R/W | 0: All stopped 1: Horizontal and vertical swing 2: Horizontal swing 3: Vertical swing |
HEX: 0x4703
DEC: 18179
|
Airflow direction mode |
| 0x4703 | Mode | enum8 | R/W | 1: Heating 2: Cooling 3: Auto 4: Dry 5: Fan only |
HEX: 0x4703
DEC: 18179
|
System operating mode |
| 0x4704 | StatusLed | enum8 | R/W | 0: Normal operation 1: Off unless an error is present 2: Off until restart |
HEX: 0x4703
DEC: 18179
|
Status LED |
| 0x4720 | Ionization | bool | R/W | 0x00: Off 0x01: On |
HEX: 0x4703
DEC: 18179
|
Air ionisation |
| 0x4727 | EcoMode | bool | R/W | 0x00: Off 0x01: On |
HEX: 0x4703
DEC: 18179
|
Eco mode |
| 0x4731 | ScreenLight | bool | R/W | 0x00: Off 0x01: On |
HEX: 0x4703
DEC: 18179
|
Display backlight |
| 0x4733 | ScreenLowBright | bool | R/W | 0x00: Off 0x01: On |
HEX: 0x4703
DEC: 18179
|
Dim display |
| 0x4734 | AcConnected | bool | R/W | 0x00: Off 0x01: On |
HEX: 0x4703
DEC: 18179
|
Air conditioner communication status |
Fan Control — 0x0202
Endpoint 1; input/server. Standard attributes:
| ID (hex) | Attribute name | Data type | Access | Value / range | Description |
|---|---|---|---|---|---|
| 0x0000 | FanMode | enum8 | RW | 5 (Auto) | Fan mode |
Manufacturer-specific attributes:
| ID (hex) | Attribute name | Data type | Access | Value / range | Manufacturer code | Description |
|---|---|---|---|---|---|---|
| 0x4700 | FanSpeed | enum8 | R/W | 0 — Auto 1 — Speed 1 2 — Speed 2 3 — Speed 3 4 — Speed 4 5 — Speed 5 |
HEX: 0x4703
DEC: 18179
|
Manual fan-speed control |
| 0x4701 | SmartFanSpeed | enum8 | R/W | 0 — Auto 1 — Quiet 2 — Speed 1 3 — Speed 2 4 — Speed 3 5 — Speed 4 6 — Speed 5 7 — Turbo |
HEX: 0x4703
DEC: 18179
|
Extended fan speed |
| 0x4710 | QuietMode | bool | R/W | 0x00: Off 0x01: On |
HEX: 0x4703
DEC: 18179
|
Quiet mode |
| 0x4711 | TurboMode | bool | R/W | 0x00: Off 0x01: On |
HEX: 0x4703
DEC: 18179
|
Turbo mode |
| 0x4723 | TargetFanSpeed | enum8 | R/W | Minimum = 0x0000 Maximum = 0x00FF |
HEX: 0x4703
DEC: 18179
|
Target fan speed |
| 0x4724 | CurrentFanSpeed | enum8 | R/W | Minimum = 0x0000 Maximum = 0x00FF |
HEX: 0x4703
DEC: 18179
|
Current fan speed |
Identify — 0x0003
Endpoint 1; input/server. Identifies the device using an indication such as flashing. Its output/client functionality can send Identify commands to other devices and supports group Identify commands.
On/Off — 0x0006
Endpoint 1; input/server.
| ID (hex) | Attribute name | Data type | Access | Value / range | Description |
|---|---|---|---|---|---|
| 0x0000 | OnOff | bool | R/W | false | Device power state |
OTA Upgrade — 0x0019
Endpoint 1; output/client. Supports over-the-air firmware updates: requesting update information, downloading firmware images, managing the update process and reporting update status.
6. Downloads
- English external converter for Zigbee2MQTT (MJS)
- Wiren Board UI converter installer (shell script)
- Wiren Board UI converter package (TAR.XZ)
These files are hosted locally. The external converter's displayed vendor and model have been adapted to Ventalen; hardware matching identifiers and protocol values are retained for compatibility.
7. Warranty
The stated warranty period is two years from sale through a retailer, retail representative or integrator. The warranty and service-life periods start when the product is handed over to the customer. If that date cannot be established, they start on the date of manufacture.
The warranty does not cover gateways or parts with signs of mechanical damage, liquid ingress, burning or opening; incomplete product sets; or faults caused by transport damage, careless handling, poor maintenance, incorrect installation or repair, work by unqualified personnel, or causes outside the manufacturer's control, such as incorrect bus voltage, fire, flooding or other force-majeure events. Warranty replacement and repairs are handled at the seller's premises.
8. Supported DAIKIN air conditioners
The series, model and short model names follow the compatibility lists.
8.1.1 2025 models
| Air conditioner series | Air conditioner model | Short model name |
| Split systems | ||
| Wall-mounted Ururu Sarara (FTXZ-N/RXZ-N) | FTXZ25N | RXZ25N | FTXZ25N |
| FTXZ35N | RXZ35N | FTXZ35N | |
| FTXZ50N | RXZ50N | FTXZ50N | |
| Wall-mounted Emura (FTXJ-A(9)/RXJ-A(9)) | FTXJ20AW/S/B(9) | RXJ20A(9) | FTXJ20AW/S/B(9) |
| FTXJ25AW/S/B(9) | RXJ25A(9) | FTXJ25AW/S/B(9) | |
| FTXJ35AW/S/B(9) | RXJ35A(9) | FTXJ35AW/S/B(9) | |
| FTXJ50AW/S/B(9) | RXJ50A(9) | FTXJ50AW/S/B(9) | |
| Wall-mounted Perfera (FTXM-A(R)/RXM-A(R9) CTXM-A(R)) | CTXM15A(R) | MXM-A9 | CTXM15A(R) |
| FTXM20A(R) | RXM20A(R9) | FTXM20A(R) | |
| FTXM25A(R) | RXM25A9(R9) | FTXM25A(R) | |
| FTXM35A(R) | RXM35A9(R9) | FTXM35A(R) | |
| FTXM50A(R) | RXM50A8(R) | FTXM50A(R) | |
| FTXM60A(R) | RXM60A(R) | FTXM60A(R) | |
| FTXM71A(R) | RXM71A(R) | FTXM71A(R) | |
| Wall-mounted Sensira (FTXF-F/RXF-F) | FTXF20F | RXF20F | FTXF20F |
| FTXF25F | RXF25F | FTXF25F | |
| FTXF35F | RXF35F | FTXF35F | |
| FTXF50F | RXF50F | FTXF50F | |
| FTXF60F | RXF60D9 | FTXF60F | |
| FTXF71F | RXF71D9 | FTXF71F | |
| Wall-mounted Sensira (FTXF-E/RXF-E) | FTXF20E | RXF20E | FTXF20E |
| FTXF25E | RXF25E | FTXF25E | |
| FTXF35E | RXF35E | FTXF35E | |
| Wall-mounted Sensira (FTXF-D/RXF-D) | FTXF20D | RXF20D | FTXF20D |
| FTXF25D | RXF25D | FTXF25D | |
| FTXF35D | RXF35D | FTXF35D | |
| FTXF50D | RXF50D | FTXF50D | |
| FTXF60D | RXF60D | FTXF60D | |
| FTXF71D | RXF71D | FTXF71D | |
| Floor-standing Perfera (FVXM-A/RXM-R(9) CVXM-A) | CVXM20A | MXM-A | CVXM20A |
| FVXM25B(A) | RXM25A(R)9 | FVXM25B(A) | |
| FVXM35B(A) | RXM35A(R)9 | FVXM35B(A) | |
| FVXM50B(A) | RXM50A(R)9 | FVXM50B(A) | |
| Sky Air split systems (R-32) | ||
| Wall-mounted Perfera (FTXM-A/RZAG-B) | FTXM35A | RZAG35B | FTXM35A |
| FTXM50A | RZAG50B | FTXM50A | |
| FTXM60A | RZAG60B | FTXM60A | |
| Multi-split systems | ||
| Wall-mounted (FTXP-N) | FTXP20N | FTXP20N |
| FTXP25N | FTXP25N | |
| FTXP35N | FTXP35N | |
8.1.2 2024 models
| Air conditioner series | Air conditioner model | Short model name |
| Split systems | ||
| Wall-mounted Ururu Sarara (FTXZ-N/RXZ-N) | FTXZ25N | RXZ25N | FTXZ25N |
| FTXZ35N | RXZ35N | FTXZ35N | |
| FTXZ50N | RXZ50N | FTXZ50N | |
| Wall-mounted Emura (FTXJ-A/RXJ-A) | FTXJ20AW/S/B | RXJ20A | FTXJ20AW/S/B |
| FTXJ25AW/S/B | RXJ25A | FTXJ25AW/S/B | |
| FTXJ35AW/S/B | RXJ35A | FTXJ35AW/S/B | |
| FTXJ42AW/S/B | RXJ42A | FTXJ42AW/S/B | |
| FTXJ50AW/S/B | RXJ50A | FTXJ50AW/S/B | |
| Wall-mounted Perfera (FTXM-R/RXM-R(9) CTXM-R) | CTXM15R | MXM-A | CTXM15R |
| FTXM20R | RXM20R9 | FTXM20R | |
| FTXM25R | RXM25R9 | FTXM25R | |
| FTXM35R | RXM35R9 | FTXM35R | |
| FTXM42R | RXM42R | FTXM42R | |
| FTXM50R | RXM50R | FTXM50R | |
| FTXM60R | RXM60R | FTXM60R | |
| FTXM71R | RXM71R | FTXM71R | |
| Wall-mounted Sensira (FTXF-E/RXF-E) | FTXF20E | RXF20E | FTXF20E |
| FTXF25E | RXF25E | FTXF25E | |
| FTXF35E | RXF35E | FTXF35E | |
| FTXF42E | RFX42E | FTXF42E | |
| Wall-mounted Sensira (FTXF-D/RXF-D) | FTXF20D | RXF20D | FTXF20D |
| FTXF25D | RXF25D | FTXF25D | |
| FTXF35D | RXF35D | FTXF35D | |
| FTXF42D | RFX42D | FTXF42D | |
| FTXF50D | RXF50D | FTXF50D | |
| FTXF60D | RXF60D | FTXF60D | |
| FTXF71D | RXF71D | FTXF71D | |
| Wall-mounted Sensira (FTXF-C(A)/RXF-C(B,A)) | FTXF20C | RXF20C | FTXF20C |
| FTXF25C | RXF25C | FTXF25C | |
| FTXF35C | RXF35C | FTXF35C | |
| FTXF42C | RXF42C | FTXF42C | |
| FTXF50A | RXF50B | FTXF50A | |
| FTXF60A | RXF60B | FTXF60A | |
| FTXF71A | RXF71A | FTXF71A | |
| Floor-standing Perfera (FVXM-A/RXM-R(9) CVXM-A) | CVXM20A | MXM-A | CVXM20A |
| FVXM25A | RXM25R9 | FVXM25A | |
| FVXM35A | RXM35R9 | FVXM35A | |
| FVXM50A | RXM50R | FVXM50A | |
| Sky Air split systems (R-32) | ||
| Wall-mounted Perfera (FTXM-R/RZAG-A) | FTXM35R | RZAG35A | FTXM35R |
| FTXM50R | RZAG50A | FTXM50R | |
| FTXM60R | RZAG60A | FTXM60R | |
| Multi-split systems | ||
| Wall-mounted (FTXP-N) | FTXP20N | FTXP20N |
| FTXP25N | FTXP25N | |
| FTXP35N | FTXP35N | |
| Wall-mounted (FTXF-B(A)(E)) | FTXF20B | FTXF20B |
| FTXF25B | FTXF25B | |
| FTXF35A | FTXF35A | |
| FTXF20E | FTXF20E | |
| FTXF25E | FTXF25E | |
| FTXF35E | FTXF35E | |
| FTXF42E | FTXF42E | |
| Wall-mounted (FTXJ-MW(MS)) | FTXJ20MW | FTXJ20MW |
| FTXJ25MW | FTXJ25MW | |
| FTXJ35MW | FTXJ35MW | |
| FTXJ50MW | FTXJ50MW | |
8.1.3 2022 models
| Air conditioner series | Air conditioner model | Short model name |
| Split systems | ||
| Wall-mounted Emura (FTXJ-A/RXJ-A) | FTXJ20AW/S/B | RXJ20A | FTXJ20AW/S/B |
| FTXJ25AW/S/B | RXJ25A | FTXJ25AW/S/B | |
| FTXJ35AW/S/B | RXJ35A | FTXJ35AW/S/B | |
| FTXJ42AW/S/B | RXJ42A | FTXJ42AW/S/B | |
| FTXJ50AW/S/B | RXJ50A | FTXJ50AW/S/B | |
| Wall-mounted Emura (FTXJ-MW(MS)/RXJ-M9(N)) | FTXJ20M-W/S | RXJ20M9 | FTXJ20M-W/S |
| FTXJ25M-W/S | RXJ25M9 | FTXJ25M-W/S | |
| FTXJ35M-W/S | RXJ35M9 | FTXJ35M-W/S | |
| FTXJ50M-W/S | RXJ50N | FTXJ50M-W/S | |
| Wall-mounted Perfera (FTXM-R/RXM-R(9) CTXM-R) | CTXM15R | MXM-A | CTXM15R |
| FTXM20R | RXM20R9 | FTXM20R | |
| FTXM25R | RXM25R9 | FTXM25R | |
| FTXM35R | RXM35R9 | FTXM35R | |
| FTXM42R | RXM42R | FTXM42R | |
| FTXM50R | RXM50R | FTXM50R | |
| FTXM60R | RXM60R | FTXM60R | |
| FTXM71R | RXM71R | FTXM71R | |
| Wall-mounted Comfora (FTXP-M(9)/RXP-M) | FTXP20M9 | RXP20M | FTXP20M9 |
| FTXP25M9 | RXP25M | FTXP25M9 | |
| FTXP35M9 | RXP35M | FTXP35M9 | |
| FTXP50M | RXP50M | FTXP50M | |
| FTXP60M | RXP60M | FTXP60M | |
| FTXP71M | RXP71M | FTXP71M | |
| Wall-mounted Sensira (FTXF-C(A)/RXF-C(B,A)) | FTXF20C | RXF20C | FTXF20C |
| FTXF25C | RXF25C | FTXF25C | |
| FTXF35C | RXF35C | FTXF35C | |
| FTXF42C | RXF42C | FTXF42C | |
| FTXF50A | RXF50B | FTXF50A | |
| FTXF60A | RXF60B | FTXF60A | |
| FTXF71A | RXF71A | FTXF71A | |
| Wall-mounted Sensira (FTXF-D/RXF-D) | FTXF20D | RXF20D | FTXF20D |
| FTXF25D | RXF25D | FTXF25D | |
| FTXF35D | RXF35D | FTXF35D | |
| FTXF42D | RFX42D | FTXF42D | |
| FTXF50D | RXF50D | FTXF50D | |
| FTXF60D | RXF60D | FTXF60D | |
| FTXF71D | RXF71D | FTXF71D | |
| Wall-mounted (FTYN-L/RYN-L) | FTYN20L | RYN20L | FTYN20L |
| FTYN25L | RYN25L | FTYN25L | |
| FTYN35L | RYN35L | FTYN35L | |
| FTYN50L | RYN50L | FTYN50L | |
| FTYN60L | RYN60L | FTYN60L | |
| Floor-standing Perfera (FVXM-A/RXM-R(9) CVXM-A) | CVXM20A | MXM-A | CVXM20A |
| FVXM25A | RXM25R9 | FVXM25A | |
| FVXM35A | RXM35R9 | FVXM35A | |
| FVXM50A | RXM50R | FVXM50A | |
| Sky Air split systems (R-32) | ||
| Wall-mounted Perfera (FTXM-R/RZAG-A) | FTXM35R | RZAG35A | FTXM35R |
| FTXM50R | RZAG50A | FTXM50R | |
| FTXM60R | RZAG60A | FTXM60R | |
| Multi-split systems | ||
| Wall-mounted (FTXF-B(A)) | FTXF20B | FTXF20B |
| FTXF25B | FTXF25B | |
| FTXF35A | FTXF35A | |
8.1.4 2021 models
| Air conditioner series | Air conditioner model | Short model name |
| Split systems | ||
| Wall-mounted Emura (FTXJ-MW(MS)/RXJ-M(N)) | FTXJ20M-W/S | RXJ20M | FTXJ20M-W/S |
| FTXJ25M-W/S | RXJ25M | FTXJ25M-W/S | |
| FTXJ35M-W/S | RXJ35M | FTXJ35M-W/S | |
| FTXJ50M-W/S | RXJ50N | FTXJ50M-W/S | |
| Wall-mounted Perfera (FTXM-R/RXM-R(9), CTXM-R) | CTXM15R | MXM-A | CTXM15R |
| FTXM20R | RXM20R9 | FTXM20R | |
| FTXM25R | RXM25R9 | FTXM25R | |
| FTXM35R | RXM35R9 | FTXM35R | |
| FTXM42R | RXM42R | FTXM42R | |
| FTXM50R | RXM50R | FTXM50R | |
| FTXM60R | RXM60R | FTXM60R | |
| FTXM71R | RXM71R | FTXM71R | |
| Wall-mounted Comfora (FTXP-K3(L)/RXP-L) | FTXP20K3/L | RXP20L | FTXP20K3/L |
| FTXP25K3/L | RXP25K3/L | FTXP25K3/L | |
| FTXP35K3/L | RXP35L | FTXP35K3/L | |
| Wall-mounted Comfora (FTXP-M(9)/RXP-M) | FTXP20M9 | RXP20M | FTXP20M9 |
| FTXP25M9 | RXP25M | FTXP25M9 | |
| FTXP35M9 | RXP35M | FTXP35M9 | |
| FTXP50M | RXP50M | FTXP50M | |
| FTXP60M | RXP60M | FTXP60M | |
| FTXP71M | RXP71M | FTXP71M | |
| Wall-mounted Sensira (FTXF-B(A)(E)) | FTXF20B | FTXF20B |
| FTXF25B | FTXF25B | |
| FTXF35A | FTXF35A | |
| FTXF50A | RXF50B | FTXF50A | |
| FTXF60A | RXF60B | FTXF60A | |
| FTXF71A | RXF71A | FTXF71A | |
| Wall-mounted Sensira (FTXF-C/RXF-C, CTXF-C) | CTXF20C | MXF-A(9) | CTXF20C |
| CTXF25C | MXF-A(9) | CTXF25C | |
| CTXF35C | MXF-A(9) | CTXF35C | |
| FTXF20C | RXF20C | FTXF20C | |
| FTXF25C | RXF25C | FTXF25C | |
| FTXF35C | RXF35C | FTXF35C | |
| FTXF42C | RXF42C | FTXF42C | |
| Wall-mounted (FTYN-L/RYN-L) | FTYN20L | RYN20L | FTYN20L |
| FTYN25L | RYN25L | FTYN25L | |
| FTYN35L | RYN35L | FTYN35L | |
| FTYN50L | RYN50L | FTYN50L | |
| FTYN60L | RYN60L | FTYN60L | |
| Floor-standing Perfera (FVXM-A/RXM-R CVXM-A) | CVXM20A | MXM-A | CVXM20A |
| FVXM25A | RXM25R | FVXM25A | |
| FVXM35A | RXM35R | FVXM35A | |
| FVXM50A | RXM50R | FVXM50A | |
| Sky Air split systems (R-32) | ||
| Wall-mounted Perfera (FTXM-R/RZAG-A) | FTXM35R | RZAG35A | FTXM35R |
| FTXM50R | RZAG50A | FTXM50R | |
| FTXM60R | RZAG60A | FTXM60R | |
8.1.5 2020 models
| Air conditioner series | Air conditioner model | Short model name |
| Split systems | ||
| Wall-mounted Emura (FTXJ-MW(MS)/RXJ-M(N)) | FTXJ20M-W/S | RXJ20M | FTXJ20M-W/S |
| FTXJ25M-W/S | RXJ25M | FTXJ25M-W/S | |
| FTXJ35M-W/S | RXJ35M | FTXJ35M-W/S | |
| FTXJ50M-W/S | RXJ50N | FTXJ50M-W/S | |
| Wall-mounted Emura (FTXG-L/RXG-L) | FTXG20LW/S | RXG20L | FTXG20LW/S |
| FTXG25LW/S | RXG25L | FTXG25LW/S | |
| FTXG35LW/S | RXG35L | FTXG35LW/S | |
| FTXG50LW/S | RXG50L | FTXG50LW/S | |
| Wall-mounted Perfera (FTXM-N/RXM-N(9), CTXM-N) | CTXM15N | MXM-M | CTXM15N |
| FTXM20N | RXM20N9 | FTXM20N | |
| FTXM25N | RXM25N9 | FTXM25N | |
| FTXM35N | RXM35N9 | FTXM35N | |
| FTXM42N | RXM42N9 | FTXM42N | |
| FTXM50N | RXM50N9 | FTXM50N | |
| FTXM60N | RXM60N9 | FTXM60N | |
| FTXM71N | RXM71N | FTXM71N | |
| Wall-mounted Perfera (FTXS-K/RXS-L3, CTXS-K) | FTXS20K | RXS20L3 | FTXS20K |
| FTXS25K | RXS25L3 | FTXS25K | |
| CTXS15K | CTXS15K | |
| CTXS35K | CTXS35K | |
| Wall-mounted Perfera (FTXS-K/RXS-L(3)) | FTXS35K | RXS35L3 | FTXS35K |
| FTXS42K | RXS42L | FTXS42K | |
| FTXS50K | RXS50L | FTXS50K | |
| Wall-mounted Perfera (FTXS-G/RXS-L/F8) | FTXS60G | RXS60L | FTXS60G |
| FTXS71G | RXS71F8 | FTXS71G | |
| Wall-mounted Comfora (FTXP-K3(L)/RXP-K3(L)) | FTXP20K3/L | RXP20K3/L | FTXP20K3/L |
| FTXP25K3/L | RXP25K3/L | FTXP25K3/L | |
| FTXP35K3/L | RXP35K3/L | FTXP35K3/L | |
| FTXP50K3/L | RXP50K3/L | FTXP50K3/L | |
| FTXP60K3/L | RXP60K3/L | FTXP60K3/L | |
| FTXP71K3/L | RXP71K3/L | FTXP71K3/L | |
| Wall-mounted Comfora (FTXP-M(9)/RXP-M) | FTXP20M9 | RXP20M | FTXP20M9 |
| FTXP25M9 | RXP25M | FTXP25M9 | |
| FTXP35M9 | RXP35M | FTXP35M9 | |
| FTXP50M | RXP50M | FTXP50M | |
| FTXP60M | RXP60M | FTXP60M | |
| FTXP71M | RXP71M | FTXP71M | |
| Wall-mounted Sensira (FTXF-A(B)/RXF-A(B)) | FTXF20B | RXF20B | FTXF20B |
| FTXF25B | RXF25B | FTXF25B | |
| FTXF35A | RXF35A | FTXF35A | |
| FTXF50A | RXF50B | FTXF50A | |
| FTXF60A | RXF60B | FTXF60A | |
| FTXF71A | RXF71A | FTXF71A | |
| Wall-mounted Sensira (FTXB-C/RXB-C) | FTXB20C | RXB20C | FTXB20C |
| FTXB25C | RXB25C | FTXB25C | |
| FTXB35C | RXB35C | FTXB35C | |
| FTXB50C | RXB50C | FTXB50C | |
| FTXB60C | RXB60C | FTXB60C | |
| Wall-mounted (FTYN-L/RYN-L) | FTYN20L | RYN20L | FTYN20L |
| FTYN25L | RYN25L | FTYN25L | |
| FTYN35L | RYN35L | FTYN35L | |
| FTYN50L | RYN50L | FTYN50L | |
| FTYN60L | RYN60L | FTYN60L | |
| Universal (FLXS-B(9)/RXS-L(3)) | FLXS25B | RXS25L3 | FLXS25B |
| FLXS35B9 | RXS35L3 | FLXS35B9 | |
| FLXS50B | RXS50L | FLXS50B | |
| FLXS60B | FLXS60B | |
| Floor-standing Nexura (FVXG-K/RXG-L) | FVXG25K | RXG25L | FVXG25K |
| FVXG35K | RXG35L | FVXG35K | |
| FVXG50K | RXG50L | FVXG50K | |
| Floor-standing (FVXM-F/RXM-N9) | FVXM25F | RXM25N9 | FVXM25F |
| FVXM35F | RXM35N9 | FVXM35F | |
| FVXM50F | RXM50N9 | FVXM50F | |
| Floor-standing (FVXS-F/RXS-L(3)) | FVXS25F | RXS25L3 | FVXS25F |
| FVXS35F | RXS35L3 | FVXS35F | |
| FVXS50F | RXS50L | FVXS50F | |
| Sky Air split systems (R-32) | ||
| Wall-mounted Perfera (FTXM-N/RZAG-A) | FTXM35N | RZAG35A | FTXM35N |
| FTXM50N | RZAG50A | FTXM50N | |
| FTXM60N | RZAG60A | FTXM60N | |
9. Air conditioner functions
The table describes the Wiren Board and Zigbee2MQTT controls. Functions depend on the air conditioner. Values shown by a user-interface converter can differ from raw Zigbee attribute values; use the cluster map for direct protocol access.
| Gateway parameter |
Wiren Board Control type |
ZigBee2MQTT | |
| Power | On Off |
✅ 1 — On 0 — Off Displayed as follows: Channel type: switch |
Power On Off |
| Operating mode | Heating Cooling Automatic Fan only Dry |
✅ 1 — Heating 2 — Cooling 3 — Automatic 4 — Fan only 5 — Dry Displayed as follows: Channel type: range |
Not used |
| Power and operating mode.
Combines the Power and Operating mode parameters. |
0 — Air conditioner off 1 — On, heating 2 — On, cooling 3 — On, automatic 4 — On, fan only 5 — On, dry |
✅ 0 — Air conditioner off 1 — On, heating 2 — On, cooling 3 — On, automatic 4 — On, fan only 5 — On, dry |
Power
On Off Operating mode Heating Cooling Automatic Dry Fan only Shown as a thermostat service with these properties: Power Operating mode |
| Indoor air temperature | Current temperature measured by the air conditioner. |
✅ Minimum: 0 Maximum: 50 Displayed as follows: Channel type: temperature value |
✅ |
| Outdoor air temperature | Current temperature measured by the air conditioner. | Not used | ✅ |
| Temperature setpoint The required temperature sent to the air conditioner. | Minimum: 16 Maximum: 32 |
✅ Minimum: 16 Maximum: 32 Displayed as follows: Channel type: range |
✅ Minimum: 16 Maximum: 32 |
| Thermostat state | 0 — Idle 1 — Heating 2 — Cooling |
Not used | Not used |
| Fan speed | 0 — Automatic speed 1 — Speed 1 2 — Speed 2 3 — Speed 3 4 — Speed 4 5 — Speed 5 |
✅
0 — Automatic speed 1 — Speed 1 2 — Speed 2 3 — Speed 3 4 — Speed 4 5 — Speed 5 Displayed as follows: Channel type: range |
0 — Automatic speed 1 — Speed 1 2 — Speed 2 3 — Speed 3 4 — Speed 4 5 — Speed 5 |
| Extended fan speed | 0 — Automatic speed 1 — Quiet 2 — Speed 1 3 — Speed 2 4 — Speed 3 4 — Speed 4 6 — Speed 5 7 — Turbo |
✅ 0 — Automatic speed 1 — Quiet 2 — Speed 1 3 — Speed 2 4 — Speed 3 5 — Speed 4 6 — Speed 5 7 — Turbo Displayed as follows: Channel type: range |
✅ 0 — Automatic speed 1 — Quiet 2 — Speed 1 3 — Speed 2 4 — Speed 3 4 — Speed 4 6 — Speed 5 7 — Turbo |
| Horizontal vanes Controls horizontal vanes (up/down airflow). | 0 — Stopped 1 — Swing (up/down) |
✅ 0 — Stopped 1 — Swing (up/down) Displayed as follows: Channel type: range |
✅ 0 — Stopped 1 — Swing (up/down) |
| Vertical vanes Controls vertical vanes (left/right airflow). | 0 — Stopped 1 — Swing (left/right) |
✅ 0 — Stopped 1 — Swing (left/right) Displayed as follows: Channel type: range |
✅ 0 — Stopped 1 — Swing (left/right) |
| Vertical and horizontal vanes
Controls simultaneous or individual vane swing. |
0 — Stopped 1 — Horizontal and vertical swing 2 — Horizontal vane swing 3 — Vertical vane swing |
✅ 0 — Stopped in the centre positions 1 — Swing (left/right and up/down) 2 — Swing (up/down) 3 — Swing (left/right) Displayed as follows: Channel type: range |
✅ 0 — Stopped 1 — Horizontal and vertical swing 2 — Horizontal vane swing 3 — Vertical vane swing |
| Quiet mode | 1 — On 0 — Off |
✅ 1 — On 0 — Off Displayed as follows: Channel type: switch |
✅ On Off |
| Turbo mode | 1 — On 0 — Off |
✅ 1 — On 0 — Off Displayed as follows: Channel type: switch |
✅ On Off |
Air conditioner display backlight | 1 — On 0 — Off |
✅ 1 — On 0 — Off Displayed as follows: Channel type: switch |
✅ On Off Displayed as follows: Service type: switch Property: on |
✅ On Off Displayed as follows: Service type: switch Property: on |
✅ On Off Displayed as follows: Service type: switch Property: on |
| Temperature correction | Service parameter | Not used | Not used |
| Air conditioner connected | 0 — No communication with the air conditioner 1 — Communication present, but packets cannot be recognised 2 — Communication present, but packets are corrupted 3 — Air conditioner connected |
0 — No communication with the air conditioner 1 — Communication present, but packets cannot be recognised 2 — Communication present, but packets are corrupted 3 — Air conditioner connected |
0 — No communication with the air conditioner 1 — Communication present, but packets cannot be recognised 2 — Communication present, but packets are corrupted 3 — Air conditioner connected |
10. System architecture
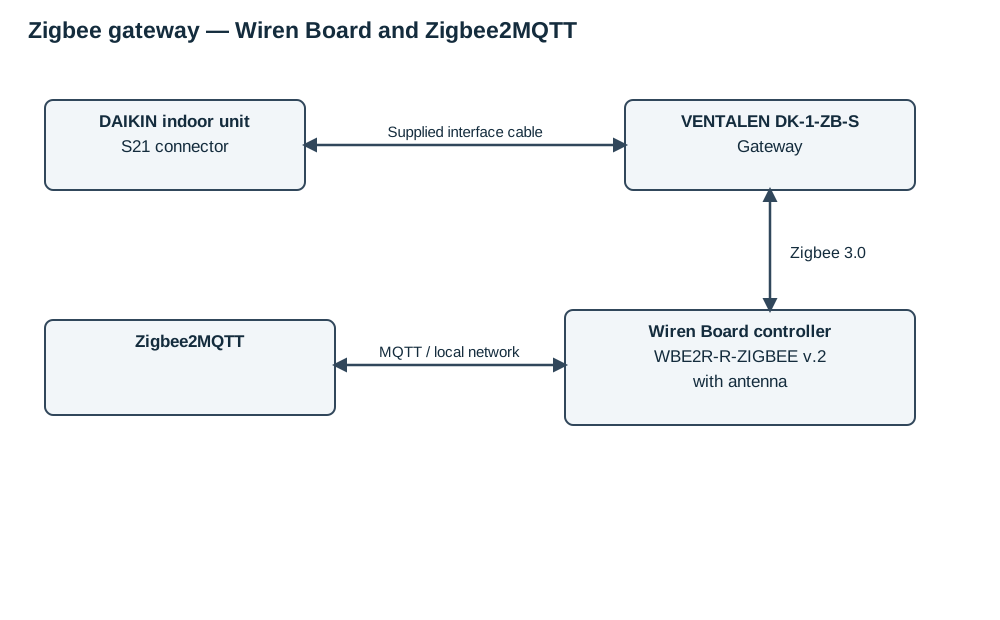
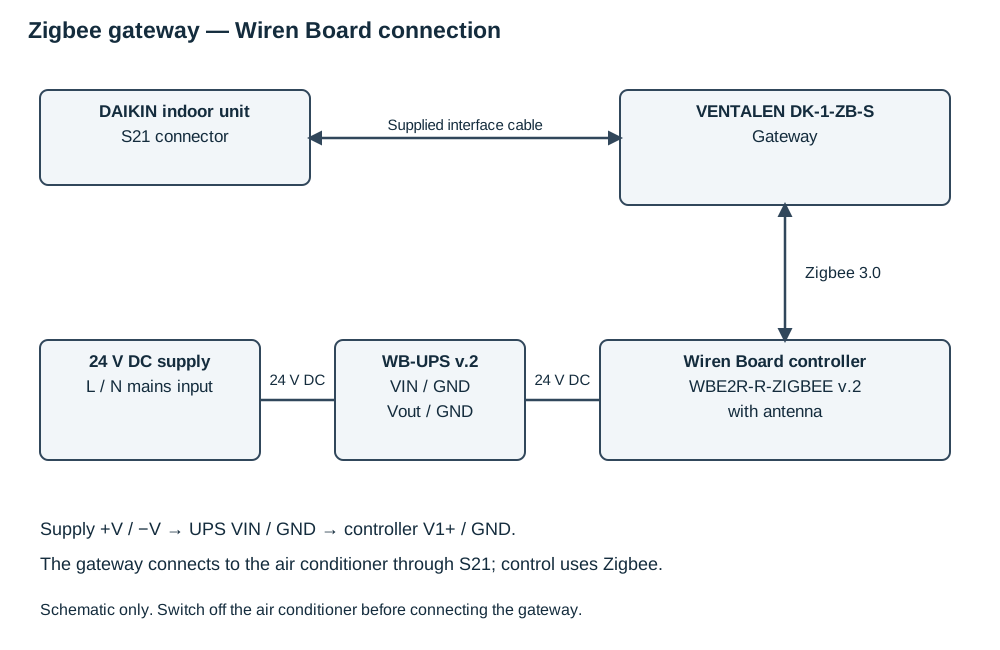
The gateway connects to the air conditioner's S21 interface and communicates wirelessly with a Zigbee coordinator. Zigbee2MQTT exposes the device through MQTT; the controller UI converter makes its controls available in Wiren Board.
10.2 Wiren Board with Zigbee2MQTT
11. Wiring
11.1 Connecting to Wiren Board
12. Configuration
12.1 Connecting to Wiren Board
12.1.1 Example controller
12.1.2 Installing the external converter
- Download the English external converter.
- Find the controller's local IP address and connect with an SFTP client such as ForkLift on macOS or FileZilla on Windows. The example uses username
root, factory passwordwirenboardand port22; use your controller's actual credentials. - Open the Zigbee2MQTT data directory. The example uses
/mnt/data/root/zigbee2mqtt/data/. - Copy the file to its
external_converterssubdirectory. - For the Zigbee2MQTT configuration described in the original example, add the following entry to
configuration.yaml, preserving YAML indentation:
external_converters:
  - external_converters/ventalen-dk-1-zb-s.mjs
The resulting example file path is /mnt/data/root/zigbee2mqtt/data/external_converters/ventalen-dk-1-zb-s.mjs. Save the configuration and restart Zigbee2MQTT. External-converter loading depends on the installed Zigbee2MQTT version; on versions that automatically load the external_converters directory, follow that version's converter-loading mechanism.
12.1.3 Pairing through Wiren Board
- Open the controller's local IP address in a browser.
- Use administrator access. Change the access level in the interface if necessary.
- In Devices, locate Zigbee2MQTT converter.
- Enable Permit join.
- Hold the gateway's pairing button for seven seconds, then release it.
- Wait for discovery and the device interview to complete. The new device and its status will appear in the interface.
12.1.4 Installing the Wiren Board UI converter
Connect to the controller over SSH. Windows users can use PowerShell or Command Prompt; Linux and macOS users can use a terminal:
ssh username@controller_ipEnter the password when prompted; characters are not echoed. After login, download and run the locally hosted installer:
wget -O /tmp/install-ventalen-converter.sh https://wirenboard.wiki/downloads/ventalen/install-ventalen-converter.sh
sudo bash /tmp/install-ventalen-converter.sh
The installer requires an existing Zigbee2MQTT installation version 2.5.1 or later and Node.js 22 or later. It installs the local converter package and its configuration schema, enables the service and starts it. Once installation succeeds, open the Wiren Board interface, select Devices and locate DK-1-ZB-S. The supplied converter executable is retained unchanged; the installer and documentation use the Ventalen name.
12.2 Controls in the Wiren Board interface
12.2.1 Main modes and functions
Power; combined power and mode; operating mode; fan speed; extended fan speed.
12.2.2 Temperature control
Indoor air temperature; temperature setpoint; outdoor air temperature.
12.2.3 Additional modes and functions
Quiet, Turbo and Eco modes.
12.2.4 Vanes
Vertical vanes control left/right airflow: 0 = stopped; 1 = swing. Horizontal vanes control up/down airflow: 0 = stopped; 1 = swing. Combined swing: 0 = stopped; 1 = horizontal and vertical; 2 = horizontal only; 3 = vertical only.
12.2.5 Indication
Display backlight and dim display.
12.2.6 Device view
Select Devices to inspect the gateway's widget, controls and current readings.
12.4 Connecting directly to Zigbee2MQTT
- Open Settings → About and check the installed version. The original example requires at least 2.5.1; native support is listed from 2.6.1.
- Update the server if it does not meet the required version.
- Open Devices and click Permit join (All).
- Hold the gateway's pairing button for seven seconds, then release it.
- Wait for discovery. If the manufacturer column reports the device as unsupported, install the external converter.
12.4.1 External converter
Use the same English MJS file and SFTP procedure in section 12.1.2. Copy it into the Zigbee2MQTT data directory's external_converters subdirectory, configure loading as required by your installed version and restart the server. After restart, check that the unsupported-device message has disappeared and that the gateway's controls are available.